Old iPhone Reactivation
24/09/10 13:30 Filed in: Computer
| friday, 24 september 2010 13:30 |
| I have an original iPhone that I wanted to use without the AT&T cellular service. We bought a new iPhone and didn't need this one for calling. After we removed the SIM card to put into the new phone, the old phone still worked for apps and music though it warned us that it had no SIM card. All was ok until I decided to restore iOS to get rid of all the original data and settings. After that it needed to be reactivated through iTunes, but would not do so without a SIM card. I talked with both AT&T and Apple who told me that I could use a SIM card from my current 3GS iPhone and iTunes on my Mac to activate the phone. Note that I had already tried a blank SIM card at AT&T's suggestion. There is no way to connect to iTunes or do anything with an unactivated phone. I could not even jail-break the phone. But this should be no problem since once I activated the older phone, I could just put the SIM back in the newer phone. Except for one problem, the older phone uses a different $20 data plan because of the slower EDGE only phone service. For that reason, AT&T had problems activating the phone through iTunes and even trying to do it manually. They said that the $30 data plan would be restored when I put the SIM back in the 3GS iPhone. After claiming that the old phone was activated and they could ring the number, the phone never rang and was not activated according to iTunes. I also talked with Apple support who tried everything until they went to escalate the call and I lost the connection. I called AT&T back again, but I would have had to go through the whole trouble shooting process again. I finally decided to just get another phone number and new SIM card. The guy from AT&T support said they could waive the normal activation fee and that I could cancel the new phone number account at no charge. But he could not send me a SIM card for an iPhone though he could for other phones. I would have to go to a local AT&T store and beg them to do the same thing for my iPhone. Instead, I got a SIM mailed to me for an old Motorola Razr phone that I still had. I had to supply the IMEI number from the Motorola phone. When I received the SIM today, I just put it in my old iPhone and it worked perfectly. The old iPhone is reactivated and running like normal. Well, almost like normal. I still have a problem with the on-screen keyboard in the portrait orientation. It is difficult to press the .?123, Space and Return keys to work. Part of the time, the Shift, Delete or other 2nd row keys will "press". Interestingly, the problem does not occur in all applications. I doubt the ordeal is over yet though. Supposedly, my 3GS iPhone is back on the $30 unlimited data plan and I still need to cancel the new phone number account. Will see how the billing turns out. |
Bubble Flare
11/09/10 11:30 Filed in: Auto
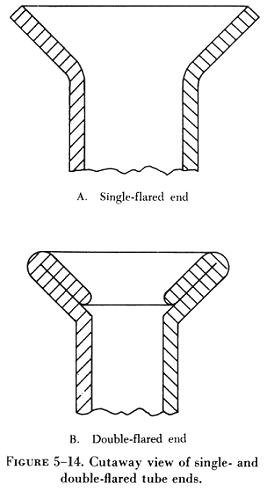
| Last week, my daughter mentioned that the brakes on our 1993 Buick Century were not working very well. The next morning, after driving it around the block, it barely stopped back in the driveway. Further investigation showed that the brake-line to the passenger side rear wheel had rusted and sprung a leak. Since I could not drive it further and I had replaced brake-lines before, I decided to fix it myself. Now, typically, all cars that I have worked on had one brake-line to the rear axle which then had one flexible hose splitting to two steel brake-lines, one to each rear wheel. This car had had separate brake-lines and hoses to each rear wheel. The brake-line was over 13 feet long and was routed around the engine and firewall. Since most of the brake-line was solid with surface rust, I thought I could cut it off and splice in a new section. That's when the "fun" began. The first rule of fixing an old car should be to take off the old part and take it with you to the auto part store. That I did not do. I went to one of my local auto part stores and picked up a 60" brake-line, some fittings and a new brake hose. Might as well replace the hose at the same time. Well, it turned out that the new brake hose did not match the old one and I had to make my second trip to the parts store. That parts store did not have the correct hose, even though their computer said the hose was for a 93 Buick. So I picked up a correct hose at another store. By then I had the old hose with me to match it up. Note that I also borrowed a brake-line flaring tool at the first store so I quickly cut the old line, flared it and connected it with the new brake-line and hose. Now it should be a simple job of getting the air out of the brake-line. Problem was that both connections in the brake-line leaked. I tightened the connection from the new line to the new hose, but stripped the threads. Back to the second parts store for a new hose and brake-line. Luckily, at this point the parts only cost about $20. Back home, I cut some more off the old brake line since my first flare was not good enough and I had some extra bends in the new line to allow for such problems. I could just stretch the new line out another inch to make another flare. But my second attempt was no good as well probably because the old line was rusty. I went back to the first parts store another 8" brake line and couple more fittings since the first line would not stretch any further and I need to get farther along to a better portion of the old brake line. Well, the new 8" brake line would not even screw into the fittings. Another trip back to the first parts store showed that they had given me a "Japanese" brake line with a larger diameter fitting. My trust in this store giving me the right parts was waning by this time. Unfortunately my third flaring attempt was unsuccessful as well and my 48 hour loan on the flaring tool was nearing its end. At this point, I decided that I would just replace the whole 13 foot brake-line with one piece, but I had to buy a 25 foot roll of brake-line to do it. Another $25. After a few days rest on the weekend, I got back into fitting the new long brake-line. I cut off about 14 feet of the roll to use. I bent the rear end of the line to fit around the axle, flared and connected it to the hose and routed the rest of the line up to the master brake cylinder on the driver's side of the engine compartment. I did not remove all of the old brake-line and ran the new line near the top of the firewall where it was easier to work with and bend. A big problem was figuring out which of the four brake-lines at the master cylinder was the correct one to replace. A repair manual would have helped. My first guess after trying to follow the two left brakes lines under the firewall was wrong. I tested the line by injecting brake fluid into it with a syringe. When it didn't come out the other cut off end, I tried the other line which passed the brake fluid. I cut the fitting off the old brake-line and reused it since it was a different thread. After pressure testings the new connected line, I discovered that the fitting at the rear wheel leaked and was still incorrect. In checking with the parts store, I found out that the flare not only needed to be a bubble-flare, but the fitting needed to be a European metric thread. So what is this thing called a "Bubble Flare"? I discovered that my 93 Buick did not have standard flared brake-lines. Actually, the standard is called a |