Mac
HyperCard to LiveCode
In 1987, Apple released its first version of HyperCard. Since I was already a Mac user, I jumped on the opportunity to use it. I used it to develop a version of the Bible named the HolyHyper for my GospelWare business.

I also used HyperCard in my job at Honeywell to keep track of all kinds of data including my telephone calls, tasks, calendar, contacts, paper files, notes, mail and network resources.

The “Work” HyperCard stack opened with a small icon bar showing all 8 sub-stacks that could be opened at the same time. There were links between the stacks. Mail was imported from the Unix mail system. Network logons and repeated operations were scripted. With the power of HyperCard, I had complete control of my data and did things that I still cannot do today with all of the Apple apps on the Mac or iOS.
I also used SuperCard, a competing product, for advanced projects including a specification generation system and a computer tools catalog. Unfortunately, a job change at Honeywell required me to use Windows at work and Apple stopped supporting HyperCard. I can still access HyperCard and SuperCard on a PowerMac G5 running Tiger OSX 10.4 and the Classic OS9 environment through ScreenSharing from my MacPro running the latest OSX system. The above screenshots were made from the MacPro screen.
In the past several years, I have started learning LiveCode which is a derivative of HyperCard. LC has cross platform support for Mac, Windows, Linux, iOS, Android and server modes. There are both open source (Community) and commercial versions so anyone can learn it for free and then distribute packaged versions for sale.
I also used HyperCard in my job at Honeywell to keep track of all kinds of data including my telephone calls, tasks, calendar, contacts, paper files, notes, mail and network resources.
The “Work” HyperCard stack opened with a small icon bar showing all 8 sub-stacks that could be opened at the same time. There were links between the stacks. Mail was imported from the Unix mail system. Network logons and repeated operations were scripted. With the power of HyperCard, I had complete control of my data and did things that I still cannot do today with all of the Apple apps on the Mac or iOS.
I also used SuperCard, a competing product, for advanced projects including a specification generation system and a computer tools catalog. Unfortunately, a job change at Honeywell required me to use Windows at work and Apple stopped supporting HyperCard. I can still access HyperCard and SuperCard on a PowerMac G5 running Tiger OSX 10.4 and the Classic OS9 environment through ScreenSharing from my MacPro running the latest OSX system. The above screenshots were made from the MacPro screen.
In the past several years, I have started learning LiveCode which is a derivative of HyperCard. LC has cross platform support for Mac, Windows, Linux, iOS, Android and server modes. There are both open source (Community) and commercial versions so anyone can learn it for free and then distribute packaged versions for sale.
Install SSD in Mac Pro
07/12/12 20:59 Filed in: Computer
My 2008 Mac Pro has seemed to get slower over the years after three upgrades of Mac OSX from 10.5 Leopard to 10.8 Mountain Lion. Each of these was an upgrade without starting from a fresh reformatted hard drive. I decided that I was going to do a fresh system rebuild and also install an SSD (Solid State Drive) at the same time. I contemplated configuring the drive as a fusion drive which Apple supports in OSX 10.8 and ships in many of the new systems. With a fusion drive, an SSD is configured with a regular hard disk (HD) to form one logical volume. Then OSX would manage this volume to keep the most active files on the SSD portion and move unused files to the slower HD. I started out to do this but had problems with mounting the volumes during the process. I decided to clean up my files and reduce the active user and systems files to fit on the SSD instead.
My Mac Pro has 4 drive bays and had 3 - 1 TB HDs with OSX files and one 160GB drive with Bootcamp and Windows 7. I work off one of the main 1 TB drives and use the other 2 for backups. In updating the system, I swapped one of the 1 TB drives for a 240 GB SSD. My main issue was how to physically mount the SSD since it is a 2 1/2 inch form factor vs the drive bays which were for 3 1/2 inch drives. In addition the drive sleds on which the drives are mounted attached to the top of the drives and not the sides. The drive sleds allow the drives to quickly taken out and swapped without the use of any cables. Since I did not have a drive sled that would mount the 2 1/2 inch SSD, I contemplated putting the SSD in the extra DVD drive bay and running SATA cables to the mother board where there are two extra SATA ports. I may still do that to allow for mounting of all 4 3 1/2 inch drives.
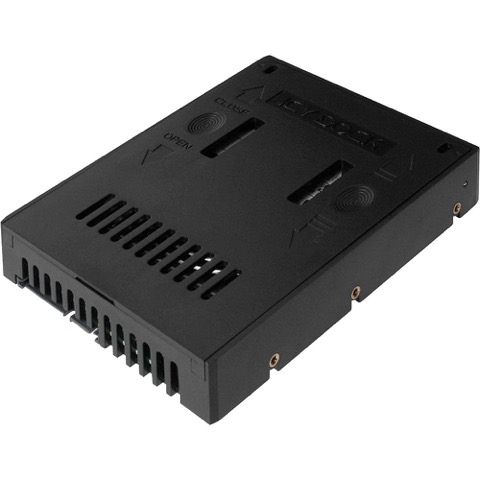
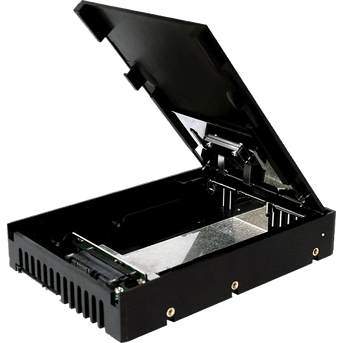
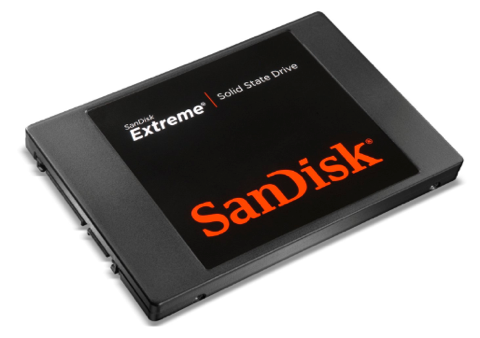
Instead, a little research revealed a converter called the Icy Dock available at the local MicroCenter computer store. The Icy Dock SSD & SATA HDD Converter, Model NB882SP-1S-1B, is shown in the following pictures. The converter is essentially an enclosure that has a connector for the SSD inside and presents a standard SATA HDD connector on the outside. The top cover flips up, the SSD is inserted and the spring loaded cover forces the SSD into position with the connector inside. There are no screws required and the converter box acts just like a larger HD. The converter is attached to the Mac Pro drive sled just like a regular drive. Note the other picture shows the SanDisk Extreme 240 GB SSD.
After cleaning up files and moving stuff out of the user, library and applications directories to other areas of the 1 TB main drive, I installed OSX 10.8.2 on the SSD. I then rebooted on the new SSD and used the OSX migration tools to move the user account over along with the applications and system library. The whole process took a couple of days of cleanup where I deleted 100 GB of unneeded files. It then took less than 2 hours to move about 200 GB to the SSD leaving about 30 GB empty for further growth. I didn’t get the exact time since I went to lunch with a friend and it was done when I came back.
The system is much faster now than it was before. I did some tests just for restarting the system. The old system would take about 3:24 minutes to restart with about 136 seconds of this time after the startup chime. Restarting off the SSD would take about 1:35 minutes with about 25 seconds after the chime. Restart time is more important than just a raw startup time since I rarely shut down the system completely. Actually, I rarely restart either. Note that the time from clicking the restart button to the chime was the same in either case, about 1:10 minutes, and doesn’t seem to depend much on the drive speed. So overall the SSD seems to be about 5 times faster than the HD in loading the system. 136/25 = 5.44.
I suspect that some of my speed improvement was from cleaning up files and splitting the files over two volumes, but glad to have the increase either way. I plan to do some more testing of applications as well, but there is a definite speed up of 2 to 3 times.
My Mac Pro has 4 drive bays and had 3 - 1 TB HDs with OSX files and one 160GB drive with Bootcamp and Windows 7. I work off one of the main 1 TB drives and use the other 2 for backups. In updating the system, I swapped one of the 1 TB drives for a 240 GB SSD. My main issue was how to physically mount the SSD since it is a 2 1/2 inch form factor vs the drive bays which were for 3 1/2 inch drives. In addition the drive sleds on which the drives are mounted attached to the top of the drives and not the sides. The drive sleds allow the drives to quickly taken out and swapped without the use of any cables. Since I did not have a drive sled that would mount the 2 1/2 inch SSD, I contemplated putting the SSD in the extra DVD drive bay and running SATA cables to the mother board where there are two extra SATA ports. I may still do that to allow for mounting of all 4 3 1/2 inch drives.
Instead, a little research revealed a converter called the Icy Dock available at the local MicroCenter computer store. The Icy Dock SSD & SATA HDD Converter, Model NB882SP-1S-1B, is shown in the following pictures. The converter is essentially an enclosure that has a connector for the SSD inside and presents a standard SATA HDD connector on the outside. The top cover flips up, the SSD is inserted and the spring loaded cover forces the SSD into position with the connector inside. There are no screws required and the converter box acts just like a larger HD. The converter is attached to the Mac Pro drive sled just like a regular drive. Note the other picture shows the SanDisk Extreme 240 GB SSD.
After cleaning up files and moving stuff out of the user, library and applications directories to other areas of the 1 TB main drive, I installed OSX 10.8.2 on the SSD. I then rebooted on the new SSD and used the OSX migration tools to move the user account over along with the applications and system library. The whole process took a couple of days of cleanup where I deleted 100 GB of unneeded files. It then took less than 2 hours to move about 200 GB to the SSD leaving about 30 GB empty for further growth. I didn’t get the exact time since I went to lunch with a friend and it was done when I came back.
The system is much faster now than it was before. I did some tests just for restarting the system. The old system would take about 3:24 minutes to restart with about 136 seconds of this time after the startup chime. Restarting off the SSD would take about 1:35 minutes with about 25 seconds after the chime. Restart time is more important than just a raw startup time since I rarely shut down the system completely. Actually, I rarely restart either. Note that the time from clicking the restart button to the chime was the same in either case, about 1:10 minutes, and doesn’t seem to depend much on the drive speed. So overall the SSD seems to be about 5 times faster than the HD in loading the system. 136/25 = 5.44.
I suspect that some of my speed improvement was from cleaning up files and splitting the files over two volumes, but glad to have the increase either way. I plan to do some more testing of applications as well, but there is a definite speed up of 2 to 3 times.
Obsolete Already
25/10/06 18:00 Filed in: Computer
| wednesday, 25 october 2006 18:00 |
| Well, I have just had this MacBook Pro (MBP) for a couple of months and now Apple has come out with a new version that is 39% faster. The new model uses the new Intel Core 2 Duo processor and more memory, but costs the same as the old one. Actually, my "old" MBP runs at the 50% idle even when recording video off my TV cable and playing two other videos at the same time. At the same time, I am using only 2/3 of of my 1 GB memory. I am not sure what I would do with the extra power though I am sure to find some benefit.
I am still appreciating the other technical features of my new system. For example, the MagSafe power connector has already been tested. Instead of using a conventional plug and socket, the power cord connects magnetically and comes off with any sidewards pull. When I accidentally jerked the power cable, it popped off rather than stressing the connection or pulling the MBP off on to the floor.
Now if the MBP does fall, it detects the movement with its Sudden Motion Sensor and parks the hard disk heads before it can hit the floor. Someone has hacked into this sensor to produce a program that can display the acceleration of the MBP in all three directions. Another programmer has written a program which can sound an alarm, take a picture of the thief and email it if it senses motion of the MBP.
There is much more unique technology in this computer, but that's all for now. |
MacBook Pro LazyBoy
10/10/06 18:00 Filed in: Computer
| tuesday, 10 october 2006 18:00 |
iPhoto Problem Solved
| Thursday, 01 October 2009 18:00 |