Computer
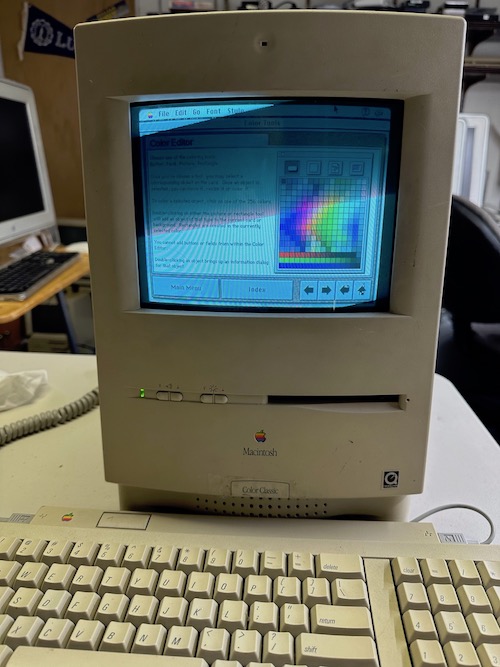
Macintosh Color Classic
20/12/22 13:52
Several years ago while at my daughter's house, I noticed an old classic Mac in her neighbor's garage; "classic" being the small all-in-1 form factor with a 9" CRT. It was a model that I did not recognize so asked him about it. He was clearing stuff out so I paid him $20 for it, not knowing if it worked or not. Turned out that it didn't boot up so it sat in my basement until this last Fall when I was taking inventory. Investigating further I learned that this Color Classic Mac was the last classic model sold in the US and only model with a color display. It was built in 1993 and followed up with a Color Classic II sold only in Japan. See https://everymac.com/systems/apple/mac_classic/specs/mac_colorclassic.html#macspecs1 or https://apps.apple.com/app/mactracker/id311421597 for further information,
I had seen some YouTube videos of these older Macs being recapped, which includes replacing old capacitors that leaked and corrupted the circuit boards. Since I am no good with soldering these small components or trouble shooting, I found a place in New York that would fix it for me. I pulled out the two circuit boards and shipped them to Amiga of Rochester for repair. My CC was even featured in their YouTube videos as it was being repaired on Oct 27 and Nov 4.
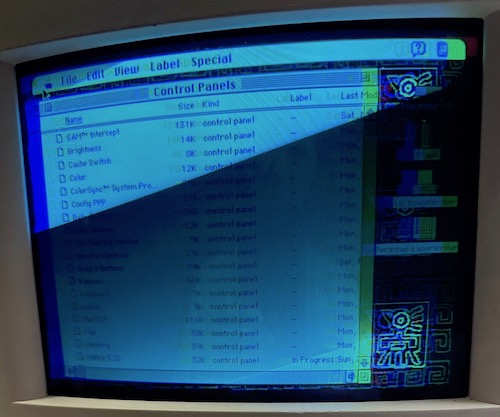
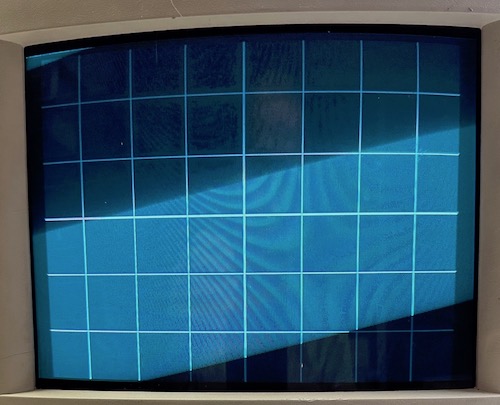
In a couple of weeks, I received the repaired boards back. After replacing the boards in the CC and powering it on, I could see it working but the display was not looking right. It had colored vertical shadows. I tried adjusting the controls for the built-in Trinitron, following instructions in Apple's repair guide but could not get it resolved. I found a bent pin on the CRT yoke connector and cleaned the boards bus connectors. Then I was able to adjust the convergence and fixed the image. See following images affected by crt scanning capture
Display before adjustment
Display test pattern for convergence
FInal Display with Hypercard Color Selection
I had seen some YouTube videos of these older Macs being recapped, which includes replacing old capacitors that leaked and corrupted the circuit boards. Since I am no good with soldering these small components or trouble shooting, I found a place in New York that would fix it for me. I pulled out the two circuit boards and shipped them to Amiga of Rochester for repair. My CC was even featured in their YouTube videos as it was being repaired on Oct 27 and Nov 4.
In a couple of weeks, I received the repaired boards back. After replacing the boards in the CC and powering it on, I could see it working but the display was not looking right. It had colored vertical shadows. I tried adjusting the controls for the built-in Trinitron, following instructions in Apple's repair guide but could not get it resolved. I found a bent pin on the CRT yoke connector and cleaned the boards bus connectors. Then I was able to adjust the convergence and fixed the image. See following images affected by crt scanning capture
Display before adjustment
Display test pattern for convergence
FInal Display with Hypercard Color Selection
Virtual Reality
14/11/16 13:17
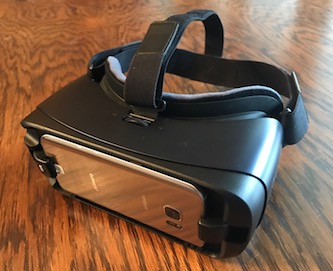
My daughter bought a Samsung Galaxy S7 smartphone in 2016 and wasn't using it. I took it over to possibly use for Android software development. After seeing some reviews of virtual reality, I discovered that Samsung also made the Gear VR headset. I figured this would be a good and low cost way to experience virtual reality.
While I don't have a lot of experience, I think this technology needs more improvement before it will be widely used. I was initially concerned about wearing my trifocal glasses with the Gear VR. Luckily I have some glasses that have only one prescription that work fine. The Gear VR also has a focus adjustment dial on the top. Even then the display is not in focus at all points. Also the resolution of the phone display is split into two images, one for each eye, and magnified to reveal the pixels. Possibly, more expensive units have better viewing quality. Even with the display quality, it is easy to overcome with action and motion in the images.
The Gear VR supports a stereo audio output jack so you can use whatever earbuds or headphones you wish. It has a small trackpad on the side and two buttons for Back and Home control. I also discovered that my SteelSeries Nimbus controller works through wifi with the Gear VR. I bought the controller for my AppleTV but have to disconnect it from the AppleTV to use it with the Gear VR. Note that the Gear VR only works with a few of the Samsung smartphones and not my new iPhone 7+.
One last comment: the battery of the S7 phone only lasts 3-4 hours and gets pretty hot. There is an external power input that can also be used but I found that VR is too disorienting and tiring to use for more than an hour at a time.
TI-99 on iPad Pro
07/02/16 12:49
Recently, I purchased an Apple iPad Pro, the largest model of the iOS product family. This iPad has a 12.9 inch Retina display with a resolution of 2732×2048 pixels. In addition to having the most powerful processor to date in an iOS device, it has a "Pencil" stylus for drawing and writing on the screen. It is the second Apple product with a stylus or pen after the Newton which was produced between 1993 and 1998. I have an eMate which was a variation of the Newton released in 1997.
Apple also produces a Smart keyboard cover to match the iPad Pro but I don't use a keyboard enough to pay the $169 cost. Instead I have a Logitech K480 Bluetooth keyboard ($40) that can switch between three different devices. It supports both Windows and Apple devices.
I also recently bought an inFocus Kangaroo Windows 10 PC. http://www.infocus.com/kangaroo. This is a miniature PC measuring 2 x 3 inches, the same size as my iPhone 6+ though twice as thick at 14mm. The Kangaroo has an Intel Atom 5x processor, 4GB of memory, 32GB storage, a 4 hr battery and a fingerprint reader. It also has both USB2 and USB3 ports along with an HDMI display port. It runs the 64bit Home version of Windows 10. The main reason I bought it was because it works with iPads though the OSLinx app which runs on both devices. The iPad is connected through a USB to Lightning cable and acts as a display for Windows 10, complete with touch capability. It also supports the Apple Pencil for drawing on the screen.
The whole combined system works pretty well though I had some difficulty setting up the Bluetooth devices. I now have the keyboard, a speaker and headphones all connected through Bluetooth. I have had a few problems with the fingerprint reader, but it works most of the time. When the iPad goes to sleep, it loses connection with the PC, but reconnects when the cable is disconnected and reconnected.
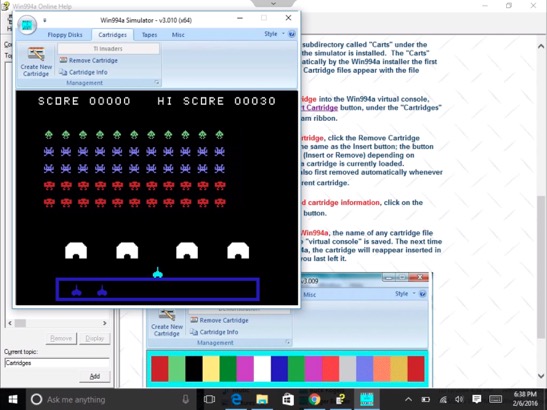
Everything I have tried running works ok, even Win994A which simulates a TI-99/4A home computer from the early 1980's. I have loaded about 200 cartridges images files from the TI computer and many more floppy disk and cassette tape images are available. I use the Bluetooth keyboard and am investigating option for a joystick controller. The following is a screen capture from the iPad Pro running TI-Invaders in the Win994A simulator. In the background is the simulator manual
Apple also produces a Smart keyboard cover to match the iPad Pro but I don't use a keyboard enough to pay the $169 cost. Instead I have a Logitech K480 Bluetooth keyboard ($40) that can switch between three different devices. It supports both Windows and Apple devices.
I also recently bought an inFocus Kangaroo Windows 10 PC. http://www.infocus.com/kangaroo. This is a miniature PC measuring 2 x 3 inches, the same size as my iPhone 6+ though twice as thick at 14mm. The Kangaroo has an Intel Atom 5x processor, 4GB of memory, 32GB storage, a 4 hr battery and a fingerprint reader. It also has both USB2 and USB3 ports along with an HDMI display port. It runs the 64bit Home version of Windows 10. The main reason I bought it was because it works with iPads though the OSLinx app which runs on both devices. The iPad is connected through a USB to Lightning cable and acts as a display for Windows 10, complete with touch capability. It also supports the Apple Pencil for drawing on the screen.
The whole combined system works pretty well though I had some difficulty setting up the Bluetooth devices. I now have the keyboard, a speaker and headphones all connected through Bluetooth. I have had a few problems with the fingerprint reader, but it works most of the time. When the iPad goes to sleep, it loses connection with the PC, but reconnects when the cable is disconnected and reconnected.
Everything I have tried running works ok, even Win994A which simulates a TI-99/4A home computer from the early 1980's. I have loaded about 200 cartridges images files from the TI computer and many more floppy disk and cassette tape images are available. I use the Bluetooth keyboard and am investigating option for a joystick controller. The following is a screen capture from the iPad Pro running TI-Invaders in the Win994A simulator. In the background is the simulator manual
LiveCode Minnebar 9 Presentation
13/04/14 08:28
The following is my presentation at the Minnebar 9 conference on April 12, 2014. It has been updated with screen shots of the LiveCode IDE and Mac, iOS and Android versions of app developed. The projection system was a problem and clipped the right side of the screen so this shows the full tool bar. I also forgot to include the stack code for full screen scaling so the Android screen did not scale appropriately. See the MobileMarch version to prove that it does work.
Livecode Minnebar9 2014
Livecode Minnebar9 2014
LiveCode MobileMarch 2014 Presentation
19/03/14 22:49
The following is my presentation at the MobileMarch conference on March 20, 2014. It has been updated with screen shots of the LiveCode IDE and Mac, iOS and Android versions of app developed.
Livecode MobileMarch 2014
Livecode MobileMarch 2014
HyperCard to LiveCode
10/02/14 09:56
In 1987, Apple released its first version of HyperCard. Since I was already a Mac user, I jumped on the opportunity to use it. I used it to develop a version of the Bible named the HolyHyper for my GospelWare business.

I also used HyperCard in my job at Honeywell to keep track of all kinds of data including my telephone calls, tasks, calendar, contacts, paper files, notes, mail and network resources.

The “Work” HyperCard stack opened with a small icon bar showing all 8 sub-stacks that could be opened at the same time. There were links between the stacks. Mail was imported from the Unix mail system. Network logons and repeated operations were scripted. With the power of HyperCard, I had complete control of my data and did things that I still cannot do today with all of the Apple apps on the Mac or iOS.
I also used SuperCard, a competing product, for advanced projects including a specification generation system and a computer tools catalog. Unfortunately, a job change at Honeywell required me to use Windows at work and Apple stopped supporting HyperCard. I can still access HyperCard and SuperCard on a PowerMac G5 running Tiger OSX 10.4 and the Classic OS9 environment through ScreenSharing from my MacPro running the latest OSX system. The above screenshots were made from the MacPro screen.
In the past several years, I have started learning LiveCode which is a derivative of HyperCard. LC has cross platform support for Mac, Windows, Linux, iOS, Android and server modes. There are both open source (Community) and commercial versions so anyone can learn it for free and then distribute packaged versions for sale.
I also used HyperCard in my job at Honeywell to keep track of all kinds of data including my telephone calls, tasks, calendar, contacts, paper files, notes, mail and network resources.
The “Work” HyperCard stack opened with a small icon bar showing all 8 sub-stacks that could be opened at the same time. There were links between the stacks. Mail was imported from the Unix mail system. Network logons and repeated operations were scripted. With the power of HyperCard, I had complete control of my data and did things that I still cannot do today with all of the Apple apps on the Mac or iOS.
I also used SuperCard, a competing product, for advanced projects including a specification generation system and a computer tools catalog. Unfortunately, a job change at Honeywell required me to use Windows at work and Apple stopped supporting HyperCard. I can still access HyperCard and SuperCard on a PowerMac G5 running Tiger OSX 10.4 and the Classic OS9 environment through ScreenSharing from my MacPro running the latest OSX system. The above screenshots were made from the MacPro screen.
In the past several years, I have started learning LiveCode which is a derivative of HyperCard. LC has cross platform support for Mac, Windows, Linux, iOS, Android and server modes. There are both open source (Community) and commercial versions so anyone can learn it for free and then distribute packaged versions for sale.
Install SSD in Mac Pro
07/12/12 20:59
My 2008 Mac Pro has seemed to get slower over the years after three upgrades of Mac OSX from 10.5 Leopard to 10.8 Mountain Lion. Each of these was an upgrade without starting from a fresh reformatted hard drive. I decided that I was going to do a fresh system rebuild and also install an SSD (Solid State Drive) at the same time. I contemplated configuring the drive as a fusion drive which Apple supports in OSX 10.8 and ships in many of the new systems. With a fusion drive, an SSD is configured with a regular hard disk (HD) to form one logical volume. Then OSX would manage this volume to keep the most active files on the SSD portion and move unused files to the slower HD. I started out to do this but had problems with mounting the volumes during the process. I decided to clean up my files and reduce the active user and systems files to fit on the SSD instead.
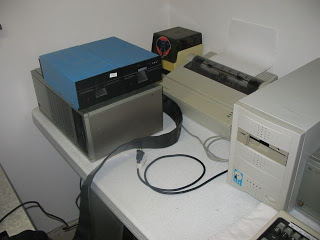
My Mac Pro has 4 drive bays and had 3 - 1 TB HDs with OSX files and one 160GB drive with Bootcamp and Windows 7. I work off one of the main 1 TB drives and use the other 2 for backups. In updating the system, I swapped one of the 1 TB drives for a 240 GB SSD. My main issue was how to physically mount the SSD since it is a 2 1/2 inch form factor vs the drive bays which were for 3 1/2 inch drives. In addition the drive sleds on which the drives are mounted attached to the top of the drives and not the sides. The drive sleds allow the drives to quickly taken out and swapped without the use of any cables. Since I did not have a drive sled that would mount the 2 1/2 inch SSD, I contemplated putting the SSD in the extra DVD drive bay and running SATA cables to the mother board where there are two extra SATA ports. I may still do that to allow for mounting of all 4 3 1/2 inch drives.
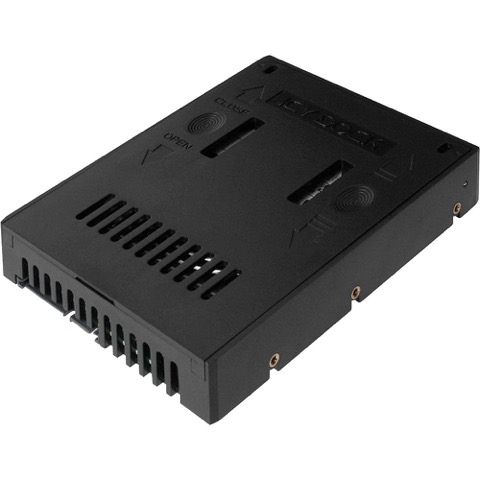
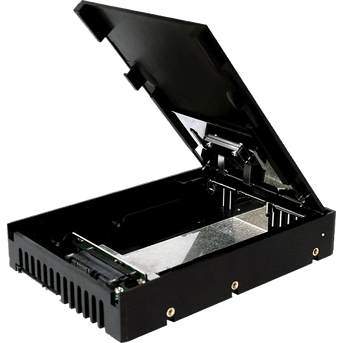
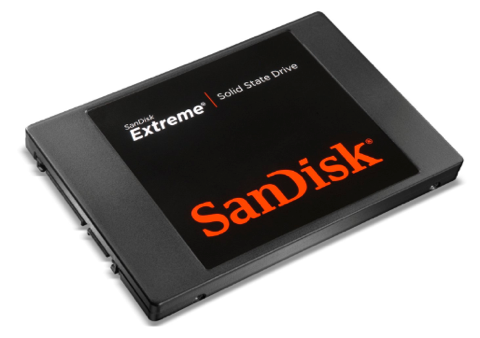
Instead, a little research revealed a converter called the Icy Dock available at the local MicroCenter computer store. The Icy Dock SSD & SATA HDD Converter, Model NB882SP-1S-1B, is shown in the following pictures. The converter is essentially an enclosure that has a connector for the SSD inside and presents a standard SATA HDD connector on the outside. The top cover flips up, the SSD is inserted and the spring loaded cover forces the SSD into position with the connector inside. There are no screws required and the converter box acts just like a larger HD. The converter is attached to the Mac Pro drive sled just like a regular drive. Note the other picture shows the SanDisk Extreme 240 GB SSD.
After cleaning up files and moving stuff out of the user, library and applications directories to other areas of the 1 TB main drive, I installed OSX 10.8.2 on the SSD. I then rebooted on the new SSD and used the OSX migration tools to move the user account over along with the applications and system library. The whole process took a couple of days of cleanup where I deleted 100 GB of unneeded files. It then took less than 2 hours to move about 200 GB to the SSD leaving about 30 GB empty for further growth. I didn’t get the exact time since I went to lunch with a friend and it was done when I came back.
The system is much faster now than it was before. I did some tests just for restarting the system. The old system would take about 3:24 minutes to restart with about 136 seconds of this time after the startup chime. Restarting off the SSD would take about 1:35 minutes with about 25 seconds after the chime. Restart time is more important than just a raw startup time since I rarely shut down the system completely. Actually, I rarely restart either. Note that the time from clicking the restart button to the chime was the same in either case, about 1:10 minutes, and doesn’t seem to depend much on the drive speed. So overall the SSD seems to be about 5 times faster than the HD in loading the system. 136/25 = 5.44.
I suspect that some of my speed improvement was from cleaning up files and splitting the files over two volumes, but glad to have the increase either way. I plan to do some more testing of applications as well, but there is a definite speed up of 2 to 3 times.
My Mac Pro has 4 drive bays and had 3 - 1 TB HDs with OSX files and one 160GB drive with Bootcamp and Windows 7. I work off one of the main 1 TB drives and use the other 2 for backups. In updating the system, I swapped one of the 1 TB drives for a 240 GB SSD. My main issue was how to physically mount the SSD since it is a 2 1/2 inch form factor vs the drive bays which were for 3 1/2 inch drives. In addition the drive sleds on which the drives are mounted attached to the top of the drives and not the sides. The drive sleds allow the drives to quickly taken out and swapped without the use of any cables. Since I did not have a drive sled that would mount the 2 1/2 inch SSD, I contemplated putting the SSD in the extra DVD drive bay and running SATA cables to the mother board where there are two extra SATA ports. I may still do that to allow for mounting of all 4 3 1/2 inch drives.
Instead, a little research revealed a converter called the Icy Dock available at the local MicroCenter computer store. The Icy Dock SSD & SATA HDD Converter, Model NB882SP-1S-1B, is shown in the following pictures. The converter is essentially an enclosure that has a connector for the SSD inside and presents a standard SATA HDD connector on the outside. The top cover flips up, the SSD is inserted and the spring loaded cover forces the SSD into position with the connector inside. There are no screws required and the converter box acts just like a larger HD. The converter is attached to the Mac Pro drive sled just like a regular drive. Note the other picture shows the SanDisk Extreme 240 GB SSD.
After cleaning up files and moving stuff out of the user, library and applications directories to other areas of the 1 TB main drive, I installed OSX 10.8.2 on the SSD. I then rebooted on the new SSD and used the OSX migration tools to move the user account over along with the applications and system library. The whole process took a couple of days of cleanup where I deleted 100 GB of unneeded files. It then took less than 2 hours to move about 200 GB to the SSD leaving about 30 GB empty for further growth. I didn’t get the exact time since I went to lunch with a friend and it was done when I came back.
The system is much faster now than it was before. I did some tests just for restarting the system. The old system would take about 3:24 minutes to restart with about 136 seconds of this time after the startup chime. Restarting off the SSD would take about 1:35 minutes with about 25 seconds after the chime. Restart time is more important than just a raw startup time since I rarely shut down the system completely. Actually, I rarely restart either. Note that the time from clicking the restart button to the chime was the same in either case, about 1:10 minutes, and doesn’t seem to depend much on the drive speed. So overall the SSD seems to be about 5 times faster than the HD in loading the system. 136/25 = 5.44.
I suspect that some of my speed improvement was from cleaning up files and splitting the files over two volumes, but glad to have the increase either way. I plan to do some more testing of applications as well, but there is a definite speed up of 2 to 3 times.
Old iPhone Reactivation
24/09/10 13:30
| friday, 24 september 2010 13:30 |
| I have an original iPhone that I wanted to use without the AT&T cellular service. We bought a new iPhone and didn't need this one for calling. After we removed the SIM card to put into the new phone, the old phone still worked for apps and music though it warned us that it had no SIM card. All was ok until I decided to restore iOS to get rid of all the original data and settings. After that it needed to be reactivated through iTunes, but would not do so without a SIM card. I talked with both AT&T and Apple who told me that I could use a SIM card from my current 3GS iPhone and iTunes on my Mac to activate the phone. Note that I had already tried a blank SIM card at AT&T's suggestion. There is no way to connect to iTunes or do anything with an unactivated phone. I could not even jail-break the phone. But this should be no problem since once I activated the older phone, I could just put the SIM back in the newer phone. Except for one problem, the older phone uses a different $20 data plan because of the slower EDGE only phone service. For that reason, AT&T had problems activating the phone through iTunes and even trying to do it manually. They said that the $30 data plan would be restored when I put the SIM back in the 3GS iPhone. After claiming that the old phone was activated and they could ring the number, the phone never rang and was not activated according to iTunes. I also talked with Apple support who tried everything until they went to escalate the call and I lost the connection. I called AT&T back again, but I would have had to go through the whole trouble shooting process again. I finally decided to just get another phone number and new SIM card. The guy from AT&T support said they could waive the normal activation fee and that I could cancel the new phone number account at no charge. But he could not send me a SIM card for an iPhone though he could for other phones. I would have to go to a local AT&T store and beg them to do the same thing for my iPhone. Instead, I got a SIM mailed to me for an old Motorola Razr phone that I still had. I had to supply the IMEI number from the Motorola phone. When I received the SIM today, I just put it in my old iPhone and it worked perfectly. The old iPhone is reactivated and running like normal. Well, almost like normal. I still have a problem with the on-screen keyboard in the portrait orientation. It is difficult to press the .?123, Space and Return keys to work. Part of the time, the Shift, Delete or other 2nd row keys will "press". Interestingly, the problem does not occur in all applications. I doubt the ordeal is over yet though. Supposedly, my 3GS iPhone is back on the $30 unlimited data plan and I still need to cancel the new phone number account. Will see how the billing turns out. |
iPad Review for Education
27/05/10 00:00
| thursday, 27 may 2010 00:00 |
| Over the past month, I have investigated the use of iPads in our local elementary school where my wife teaches. Last week, I presented my findings to a small group of teachers, the prinicipal and technical support staff. While most of the presentation was a general overview of the iPad, there were a few specifics relative to education that I will review here. I had 68 slides of which about 40 were direct screen shots from the iPad, Mac or PC screens. The presentation was developed with Apple's Keynote application on a Mac and presented through Keynote on the iPad. An iPad VGA adapter cable was used to connect to an overhead projector, but does not support direct projection of the iPad screen. Only output from Keynote, YouTube and other video apps can use the VGA adapter. |
TI99 CF7+
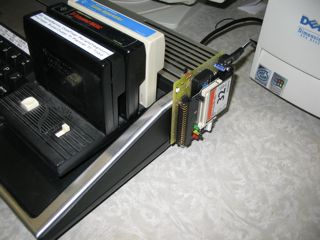
03/05/10 13:22
| I have a couple of new additions to my old TI99 computer systems in the last week [May 2010]. First, I now have 10 reconfigured cartridges that include brand new circuit boards with a 64k EPROMs. These were developed, manufactured and distributed by members of the international |
iPad Experience
16/04/10 12:24
| friday, 16 april 2010 12:24 |
| It has almost been three weeks since I received my new iPad through UPS delivery. I really think it is a paradigm shift in computing. I currently have an iPhone, a MacBook Pro (MBP) laptop and a MacPro tower in addition to this iPad. If I had to give up one of the four, it would be the MBP. But if I could only have one of the four, it would be an MBP, possibly a new upgraded version. When I travel again, I would probably just take the iPad and leave the MBP at home unless someone with me wants internet access as well. I am actually using the iPad as a touchpad and a keyboard while editing this article on the MacPro. The Mobile Air Mouse Pro app has versions for the iPad as well as the iPhone. It essentially changes the iPad into a large touch pad for the Mac or PC. In addition, it has a keyboard layout that can be hidden and works in either portrait or landscape orientations. It work pretty good though the right-click equivalent using a two finger tab is sporadic. It also communicates through wi-fi which is flakey and slow through my local router. This problem was alleviated by setting up internet sharing using my MacPro airport wi-fi and connecting direct to the MacPro. Note the other apps work fine through my local router and routers at other locations. it is just the latency that is a pain with the touchpad method to the Mac. The mobile mouse pad also shows the Mac dock and allows switching between apps. The keyboard also has all function, arrow and control keys as well as four programmable keys. It uses a server app on the Mac which is is configurable for different apps. It has special buttons to control iTunes and Safari. I actually had some problems editing this Joomla article directly on the iPad. The iPad keyboard would not pop up to enter text in the main editor field. It worked fine for other text fields. The work around is to switch to editing HTML, but I chose to use the touchpad method and edit it on the Mac. I could add much more about using the iPad, but am enjoying using it rather than writing about it. |
iPhoto Problem Solved
01/10/09 18:00
| Thursday, 01 October 2009 18:00 |
TI99 Update
28/06/09 18:00
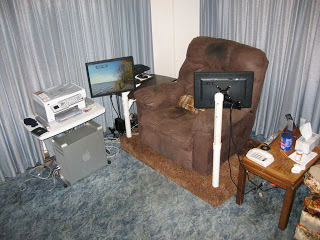
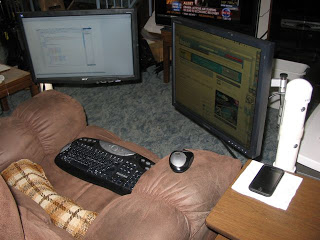
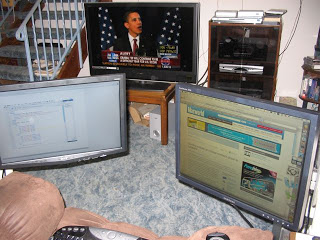
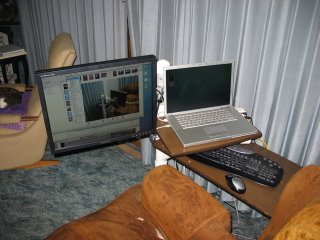
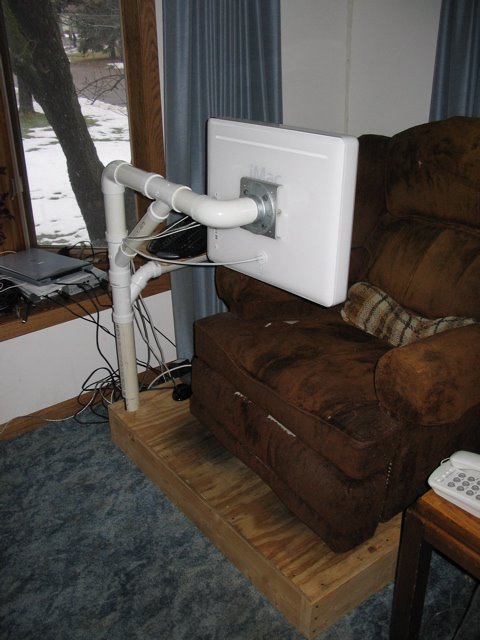
Dual Screen Recliner
08/05/09 18:00
| friday, 08 may 2009 18:00 |
Macintosh 25th Birthday
25/01/09 18:00
| sunday, 25 january 2009 18:00 |
Computer Inventory
27/02/08 18:00
| wednesday, 27 february 2008 18:00 |
| I was just exchanging email with an old friend and mentioned this blog to him. I said I needed to update it so decided not to procrastinate any further. This update will relate a current inventory that I did of my computer collection. Note this is somewhat an update to the posting of Feb 15, 2006 titled "Summary of Computers Used" except these are computers that I presently own. The number in ( ) is the number that I have of that model. That should total 44 "computers" in my museum though only about 80% are working. Wolverine Adding Machine Post Slide Rule TI99/4 (2) TI99/4A Black & Silver (9) TI99/4A Beige TI99/4A Modified with Mechatronics 80 Column Card & Rave 101 Keyboard Mac Plus (2) Mac SE/30 Mac Classic II (2) Mac IIvx Mac IIci (2) Mac PowerBook 170 (2) Mac LC II Mac LC III Mac Quadra 660AV Mac Performa 630CD Mac Performa 636CD Mac Performa 6116CD (2) Mac Powerbook Duo 2300C iMac G3 Bondi Blue iMac G3 Strawberry iBook G3 Blue iBook G4 iMac G5 PowerMac G5 MacBook Pro 15" (Dual processor, away at college) Mac Pro (Quad processor) AppleTV Dell Dimension XPS R400 PC - Win98 Nobilis PC - WinXP |
Obsolete Already
25/10/06 18:00
| wednesday, 25 october 2006 18:00 |
| Well, I have just had this MacBook Pro (MBP) for a couple of months and now Apple has come out with a new version that is 39% faster. The new model uses the new Intel Core 2 Duo processor and more memory, but costs the same as the old one. Actually, my "old" MBP runs at the 50% idle even when recording video off my TV cable and playing two other videos at the same time. At the same time, I am using only 2/3 of of my 1 GB memory. I am not sure what I would do with the extra power though I am sure to find some benefit.
I am still appreciating the other technical features of my new system. For example, the MagSafe power connector has already been tested. Instead of using a conventional plug and socket, the power cord connects magnetically and comes off with any sidewards pull. When I accidentally jerked the power cable, it popped off rather than stressing the connection or pulling the MBP off on to the floor.
Now if the MBP does fall, it detects the movement with its Sudden Motion Sensor and parks the hard disk heads before it can hit the floor. Someone has hacked into this sensor to produce a program that can display the acceleration of the MBP in all three directions. Another programmer has written a program which can sound an alarm, take a picture of the thief and email it if it senses motion of the MBP.
There is much more unique technology in this computer, but that's all for now. |
MacBook Pro LazyBoy
10/10/06 18:00
| tuesday, 10 october 2006 18:00 |
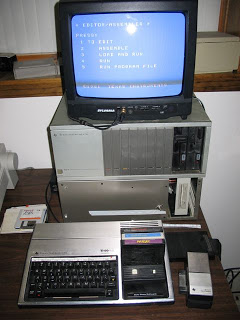
TI99 Computer
09/03/06 18:00
| TI-99/4A Home Computer |
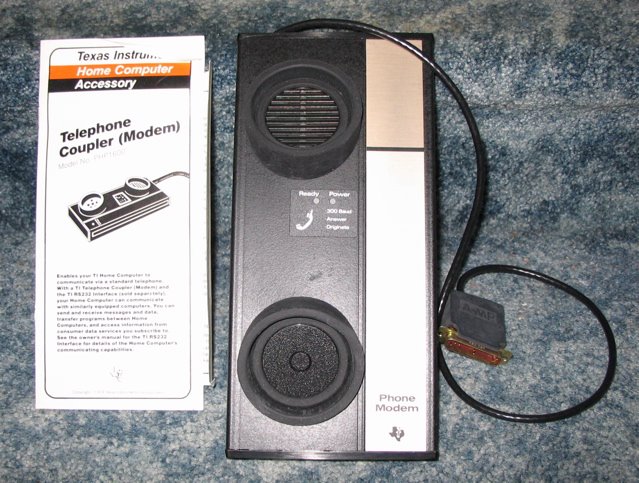
Modems
02/03/06 18:00
| thursday, 02 march 2006 18:00 |

Virtual Machine
22/02/06 18:00
| wednesday, 22 february 2006 18:00 |
Analog Computer
18/02/06 18:00
| saturday, 18 february 2006 18:00 |
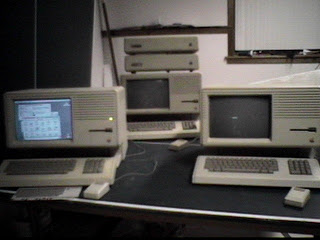
Summary of Computers Used
14/02/06 18:00
| tuesday, 14 february 2006 18:00 |
| What I hope to add to this blog in the future is a little info about computers that I have used in the past. The following is just a list of what I can remember now though I will update the list if I remember more. They are in chronological order:
Wolverine adding machine
Post slide rule
Analog computer
IBM System 360 - card reader
GE Timeshare TeleType - paper tape
DEC PDP 8/e
HP 35, 45, 25 calculators
IBM System 370
General Automation SPC16
Computervision
Control Data 6600, 7600
Apple IIe
TI99/4 home computer
Commodore 64
IBM TSO/CMS
VAX 780
Apollo
Control Data 830
IBM PC - DOS
DEC Rainbow PC - CP/M
Apple Lisa
Mac XL
Mac 512, Plus, SE, SE30, IIci
Compaq PC - Win3.1
iMac
HP Unix workstation
Toshiba laptop - Win98
Compaq, Dell - Windows 2000
Sun workstation - Solaris
Power Mac G4, G5 - OSX
Virtual PC - Windows XP
eMac, iBook
iMac G5 |
iMac G5 VESA Stand
11/02/06 18:00
| saturday, 11 february 2006 18:00 |
